LogoLogo
HomepageDocumentationGet FeedOtter
  • Welcome to FeedOtter
  • Automated Newsletters
    • Getting Started
      • Marketo Sending
      • Pardot Sending
      • Eloqua Sending
      • SFMC Sending
      • HubSpot Sending
      • MailChimp Sending
      • Active Campaign Sending
    • Scheduling Your Send
      • Require New Content to Send
      • Intervals
    • Features
      • Last Send Date
      • Send Now
      • Sending History
      • UTM Parameters
      • Custom Subject Lines
      • Notifications
      • Multiple Feeds
        • Merging Feeds
        • Pulling in External JSON/XML Data
  • Curated Newsletters
    • Getting Started
      • Newsletter Defaults
      • Adding Content Sources
      • Create your first curated issue
      • Test, Review, and Publish your curated email newsletter
    • Publishing
      • Publishing to Marketo
        • Create a New Email Program and Email
        • Create a New Email in Marketo
        • Schedule an Email Program Send From the FeedOtter Interface
      • Publishing to Pardot
      • Publishing to Eloqua
        • Create a New Email and Schedule a Send
        • Create a New Email
        • Update an Existing Email
        • Issue Naming
      • Publishing to HubSpot
      • Publishing to MailChimp
      • Publishing to HTML
    • Tags
    • Bookmarking Content
    • Content Sources
      • Google Sheets
      • YouTube
      • Algolia
      • WordPress API
      • UberFlip
      • JSON / XML API
        • Custom Data Fields
    • Troubleshooting
      • Marketo Duplicate Object Naming
      • Marketo Emoji Support
      • MailChimp From Address
      • Pardot emails are missing a required Unsubscribe or Preference Center tag
  • Integrations
    • Getting Started
    • Marketo
      • How to Set Up Your Marketo Integration
      • FAQ
        • Email Reporting
        • Sending in Recipient Time Zone
        • Marketo Data Access
        • Custom Marketo Program Naming
        • Branded Domain and IP Settings
      • Troubleshooting
        • How do I reset my Marketo Automated Campaign
        • Marketo Error: Program with the same name exists
        • Marketo error: Daily quota '50000'
        • Marketo Error: Invalid request. Please check and try again.
        • Curated Issue Fails to Publish
          • FeedOtter Can Not Approve Marketo Template
          • Marketo rejects Duplicate Name
      • Exporting a FeedOtter email into Marketo
    • Pardot / Account Engagement
      • How to Set Up Your Pardot Integration
      • FAQ
        • Salesforce IP Whitelisting
        • Where Can I Find My Pardot Business Unit ID?
        • Pardot Data Access
        • Advanced Settings
          • Set Up a User for Integration
      • Troubleshooting
    • Eloqua
      • How to Set Up Your Eloqua Integration
      • FAQ
        • Custom Email and Campaign Naming
        • Custom Field Setup
        • Updating Eloqua Canvas Email
        • Eloqua Data Access
        • VMTA and BBE
    • Salesforce Marketing Cloud
      • How to Set Up Your SFMC Integration
      • FAQ
        • SFMC Tracking Code
        • SFMC Resources and Links
      • Troubleshooting
    • HubSpot
      • How to Set Up Your HubSpot Integration
      • FAQ
      • Manually publish an email to HubSpot
    • MailChimp
      • How to Set Up Your MailChimp Integration
    • ActiveCampaign
      • How to Set Up Your ActiveCampaign Integration
    • Microsoft Dynamics Marketing
      • How to Set Up Your MS Dynamics Integration
  • Email Templates
    • Getting Started
      • Custom Template
        • HTML Email Guidelines
          • In-Depth HTML Email Guidelines
        • Custom Template Resources
          • ESP Template Use
            • Export a Marketo Template for Use in FeedOtter
            • Export a Pardot Template for Use in FeedOtter
            • Export a HubSpot Template for Use in FeedOtter
            • Export an ActiveCampaign Template for Use in FeedOtter
        • Where to Access Template Code
        • Getting Started with FeedOtter Templates
          • Creating a Basic Email Template
          • Advanced Email Templates
            • Slicing loops
            • Multiple Feed Emails
            • Email With Columns
            • Conditionals
            • Filters
              • Image Resize Filter
              • Date Formatting Filter
              • Text Manipulation Filters
              • Other Handy Filters
            • Non-RSS XML values
            • Custom fields
            • Display a Full Article in Your Email
          • Curated Email Setup Best Practices
            • Curated Newsletter Sections
      • Element Customization
        • About Email Images
    • FeedOtter Tokens
    • ESP-Specific Tokens
      • Marketo Tokens
        • Using Marketo Tokens in the From and Reply-To
      • Pardot Tokens
        • Pardot Merge Token Reference
      • Eloqua Tokens
      • SFMC Tokens
      • HubSpot Tokens
      • MailChimp Tokens
      • ActiveCampaign Tokens
  • Account Management
    • Account Information
    • Company Details
    • Manage Users
      • Adding Users
      • User Roles
      • Campaign Permissions
      • Transfer Ownership
      • Disabling Users
    • Security
      • Enable SSO in Your Account
        • Enable SSO With Okta as the Identity Provider
        • Enable SSO with a Generic Identity Provider
        • Enable SSO with Azure AD as the Identity Provider
        • Enable SSO with OneLogin as the Identity Provider
      • Account Level 2FA
    • Billing
      • Update Your Payment Card
      • View Account Usage
      • View Receipts
      • Change Your Subscription Plan
  • FAQ
    • How to manually publish a curated newsletter
    • WordPress RSS Feed Reference
    • How to find your RSS feed
    • Help with HTML encoding
    • My automated email did not send as expected
    • How do I hard refresh my browser?
    • How to Remove "This Post First Appeared" from Your Blog's RSS Feed in WordPress
    • Whitelisting FeedOtter
    • Whitelist FeedOtter on CloudFlare
    • How do I contact support?
    • Red Dot: Campaign Status
      • Confirm your RSS Feed is valid
      • Confirm your integration is still connected
Powered by GitBook
On this page
  • Google Authorization
  • Create A Content Source
  • What Makes a Good Google Sheet Content Source?
  • Accessing your Google Sheet data in FeedOtter
  • Accessing non-standard Sheet data in your email
  1. Curated Newsletters
  2. Content Sources

Google Sheets

Integrate FeedOtter with data from your Google Sheets

FeedOtter allows you to easily drag and drop content from a Google Sheet into your email newsletters via our Content Source integration.

Here are the steps to setup your first Google Sheet content source.

Google Authorization

The first step is to create a new Integration in FeedOtter for your Google account. This step only needs to be done once for each Google Drive resource you need to access.

  1. In FeedOtter, navigate to Settings > Integration

  2. Click Add integration

  3. Customize the name of your Google connection (optional)

  4. Follow the on-screen steps to authorize your Google Account

  5. Click Allow to give FeedOtter permission to connect your Google Sheet spreadsheets.

If you see a warning from Google, please click the "Continue Anyway" button. This message may appear from time to time as Google reviews our integration.

After completing the setup you will be returned to FeedOtter's Integration table.

Click the TEST button next to your new Integration and ensure it lights up green.

Create A Content Source

To create a new content source from a Google Sheet.

  1. In FeedOtter, navigate to Settings > Content Sources

  2. Click New Content Source

  3. Select Google Sheet

  4. Give your Content Source a memorable name

  5. Under Google Connection, select the Google connection related to the Sheet you want to access.

  6. Next we need to find and input the unique id of our Google Sheet. To do this open your Google Sheet. In the URL box of the sheet, select the long string of letters and numbers and copy. This is your Google Sheets ID.

  1. Click Lookup.

  2. If your settings are correct FeedOtter will present dropdowns that allow you to select the Sheet > Worksheet (tab) you wish to access and map up the basic Title, Description, Date, and URL fields.

If you wish to access addl. data from your Google sheet please open a ticket with our support team for assistance. Data beyond the standard fields can be accessed using the [[post.asArray.columnName.value]] token paradigm. Replace the word "columnName" with the actual name of your Sheet column. (case-sensitive)

  1. Click Save, and then the TEST button to ensure everything is working.

  2. You will now be able to view data from your Google Sheet when adding Available Content in Curated Newsletters.

What Makes a Good Google Sheet Content Source?

When creating your Google Sheet list of content, you’ll need to ensure you have basic fields of information including Title, URL, and Description. You’ll also need the Image URL if you’re adding images to your newsletter.

Create these fields in your Google Sheet and start listing your content accordingly.

Accessing your Google Sheet data in FeedOtter

To start using your Google Sheet data in a newsletter

Create a new Curated Newsletter Issue, or edit and existing one.

Under the Content tab, click Add Content. Here, you’ll see the newly added Google Sheet. Select it, and see your content available for choosing.
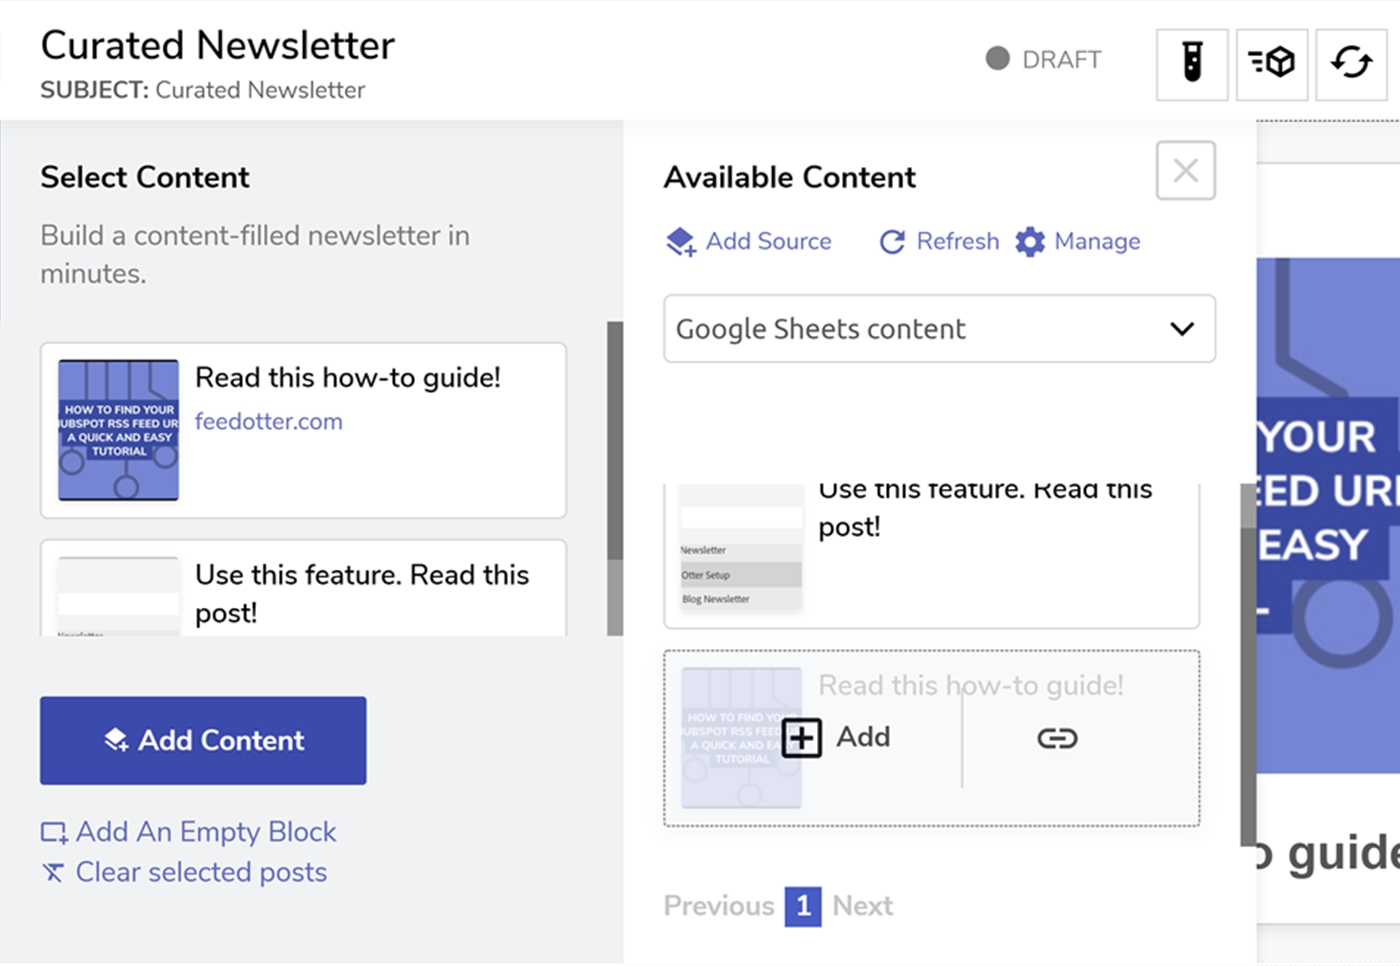
NOTE: If you edit any of the content directly in FeedOtter, this will NOT update or change the content in your Google Sheet. However, if you edit content in Google Sheets, you can refresh your FeedOtter page and see those changes reflected in FeedOtter.

Accessing non-standard Sheet data in your email

FeedOtter allows you to add custom Google Sheets data in Curated Newsletters with a little bit of HTML coding. In our spreadsheet we already created a column named Custom1.

Here is how to add that data into our HTML email code.

For custom data we will add tokens that look like this:

[[post.asArray.Custom1]] //replace "Custom1" with your exact column name.

You will need to edit your HTML email's code, this part assumes you know how to do this.

On line 584, we pasted in the appropriate token. Save your code changes and you should see the custom data appear in your email preview.

Last updated 3 months ago

Google Sheet data is accessed when building .

Google Sheets to newsletter in FeedOtter Curated Builder

Here, you can drag, drop and reorder content to look they way you want in your newsletter. You can also edit each content block, just like you would with an RSS feed or the content.

Curated Newsletters
Content Queue Bookmark
Open your Google Sheet and copy the id string as shown above into the FeedOtter UI.
Data should be laid out with a heading in row 1 and data organized into simple columns and rows.