> For the complete documentation index, see [llms.txt](https://docs.feedotter.com/llms.txt). Markdown versions of documentation pages are available by appending `.md` to page URLs; this page is available as [Markdown](https://docs.feedotter.com/integrations/marketo/how-to-set-up-your-marketo-integration.md).
# How to Set Up Your Marketo Integration
## Connecting Your Marketo Account to FeedOtter
Setting up a new Marketo integration is relatively straightforward. It involves creating a new user with API-only access and a custom service which will allow FeedOtter to authenticate against your Marketo account. We created this condensed help topic based on documentation [provided by Marketo here](http://developers.marketo.com/documentation/rest/custom-service/).
### About Marketo REST API Credentials
Marketo connects to FeedOtter using secure REST API endpoints and permissions similar to many other Marketo integrations. If you have integrated other Marketo add-ons you will find this process familiar. If you need assistance, we've created a helpful guide that will walk you through the entire process.
### Create A Marketo API Role
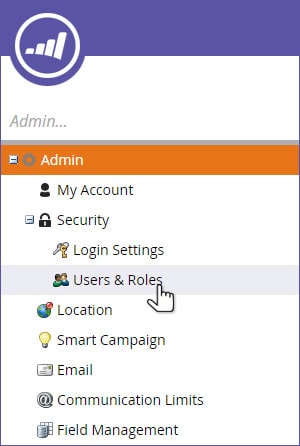
The first step is to create a Marketo API Role. Go to the Admin area of your Marketo account, select Users & Roles from the left-side menu.
Create a new role. This role will contain the permissions specific to the Marketo API user we will create next. Select Roles at the top of your screen and click the New Role button.
Give the new role a name and description. In this example we called it “API Role” to remind us in the future why it was created. Under permissions, expand the Access API section and check the following 2 permissions:
* Approve Assets
* Read-Write Assets
Then click the Save button.
These basic permissions will allow FeedOtter to access the Marketo email API in order to create, update, and approve new emails in your Marketo account.
### Create An API User
Now create an API-only user. This is the user account FeedOtter will use to authenticate against the Marketo API. Navigate to the Users tab, and click the Invite New User button.
This dialog will come up – fill in the details according to the screen shot below.\
\
It’s important that you select the API Role you just created above, as well as checking the API Only checkbox. This will ensure that FeedOtter can only access your data through the API and can’t log in directly to the application.\
\
NOTE: The email address is a placeholder value to track Marketo API usage. You will need to use your own email address such as "." Whether you choose to monitor this account is up to you – generally you shouldn’t need to.
{% hint style="danger" %}
API Only: Be sure to check API only check box.
{% endhint %}
### Create A Custom Service
Now that you’ve created a user with access to the API, you need a custom service to identify the application (FeedOtter) to Marketo.\
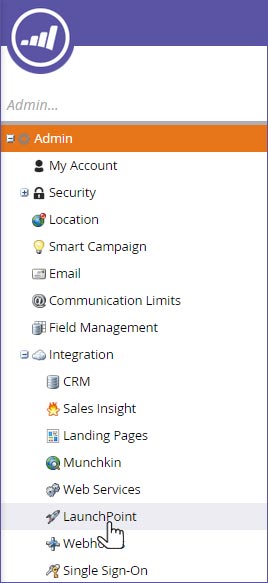
While still in Admin, navigate to LaunchPoint on the left sidebar.
Under Installed Services, click the New button.
This will bring up the New Service dialog. Fill out the dialog with the values shown below. Make sure and select the API only user which you created in the previous step.
### Marketo API Credentials
Setup in Marketo is now complete. You’ve created a role providing access to the API, and created a user assigned to that role. You’ve also created a new service to provide authentication to the FeedOtter platform.\
\
To view the authentication credentials, click the View Details link in the service list for the FeedOtter service you just created.
FeedOtter needs the Client Id and Client Secret values you see in the dialog that comes up. You will use them in the FeedOtter connection setup in the next section.
### Webservice URL
FeedOtter uses Marketo’s REST API. Different Marketo customers have different URLs for accessing the API, and FeedOtter needs those URLs in order to function correctly.\
\
The URL's specific to your account are located under Web Services in the admin menu.

There is a section on the page called REST API with two values: Endpoint and Identity. **FeedOtter only needs the URL labeled Endpoint.**
Configuration in Marketo is complete and you should have the three values FeedOtter requires for a successful integration:
* Client ID
* Client Secret
* REST API endpoint URL
### Add Your Marketo Credentials to FeedOtter
Return to FeedOtter and click **Settings** in the upper-right corner.
* Select **Integrations** from the left menu bar
* Click the **Add Integration** button
* Enter the Marketo details collected in the previous steps
{% hint style="info" %}
If you have the Marketo Workspaces feature you should carefully paste the exact text name of your **Workspace** as seen in the Marketing Activities tree view. For all other users this field should be left untouched.
{% endhint %}
* Follow the additional steps below.
You’ll now see some additional fields as of 2025:
* A check box for legacy usage
* Subscription
* Munchkin ID
### What you need to do
If you are still using the previous login system ("old" Marketo):
* Leave the "Use Legacy URLs" box checked.
* You do not need to change anything else.
\
If you are using the new Marketo login system:
* Uncheck the “Use Legacy URLs” box.
* Fill in your Subscription and Munchkin ID.
{% hint style="info" %}
The “previous login system (old Marketo)” vs. the “new Marketo login system,” refers to the recent transition Marketo has made to Adobe’s authentication system.
If your instance is still using the legacy login system (the original Marketo-specific authentication), URLs and login behavior will remain unchanged.
{% endhint %}
To location the Subscription and Munchkin ID, click the My Account tab within your Marketo:
Then, under **Admin,** navigate to **My Account.** Here you will find the **Subscription** and **Munchkin ID** within the **Support Information** box:
Once the Subscription and Munchkin ID are input within FeedOtter, Save and close the window. All links etc. should work as expected.
\_\_\_\_\_\_\_\_\_\_\_\_\_\_\_\_\_\_\_\_\_\_\_\_\_\_\_\_\_\_\_\_\_\_\_\_\_\_\_\_\_\_\_\_\_\_\_\_\_\_\_\_\_\_\_\_\_\_\_\_\_\_\_\_\_\_\_\_\_\_\_\_\_\_\_\_\_\_\_\_\_\_\_\_\_\_\_\_\_\_\_\_\_\_\
\
You can access your Marketo connection settings at any time by clicking **Settings** the upper-right of FeedOtter and choosing **Integrations**.
{% hint style="success" %}
This connection process is a one-time task and will never expire or need to be re-connected as long as it is present in Marketo.
{% endhint %}
At this point you are ready to set up your RSS and/or curated newsletters using the following tutorials:
* [Getting Started](/automations/getting-started.md) (Automated Newsletters)
* [Broken mention](broken://pages/wp9CWnlsAU53UvvWdcZ3) (Curated Newsletters)